


Get ready, y’all because I am OBSESSED. I recently decided to try my hand at hand painting my own detail styling mats for flat lays on wedding days, and not to be dramatic, but after seeing how these turned out, I don’t know that life will ever be the same! I’ve been looking for unique ways to level up my client experience, and wanted to start by adding a little something special to the beginning of the wedding day— custom-painted detail styling mats designed to complement the design of the wedding day!
I got a lot of questions about how I made this weekend’s mat over on IG and wanted to share everything I used and learned, just in case you wanted to try painting a mat yourself!
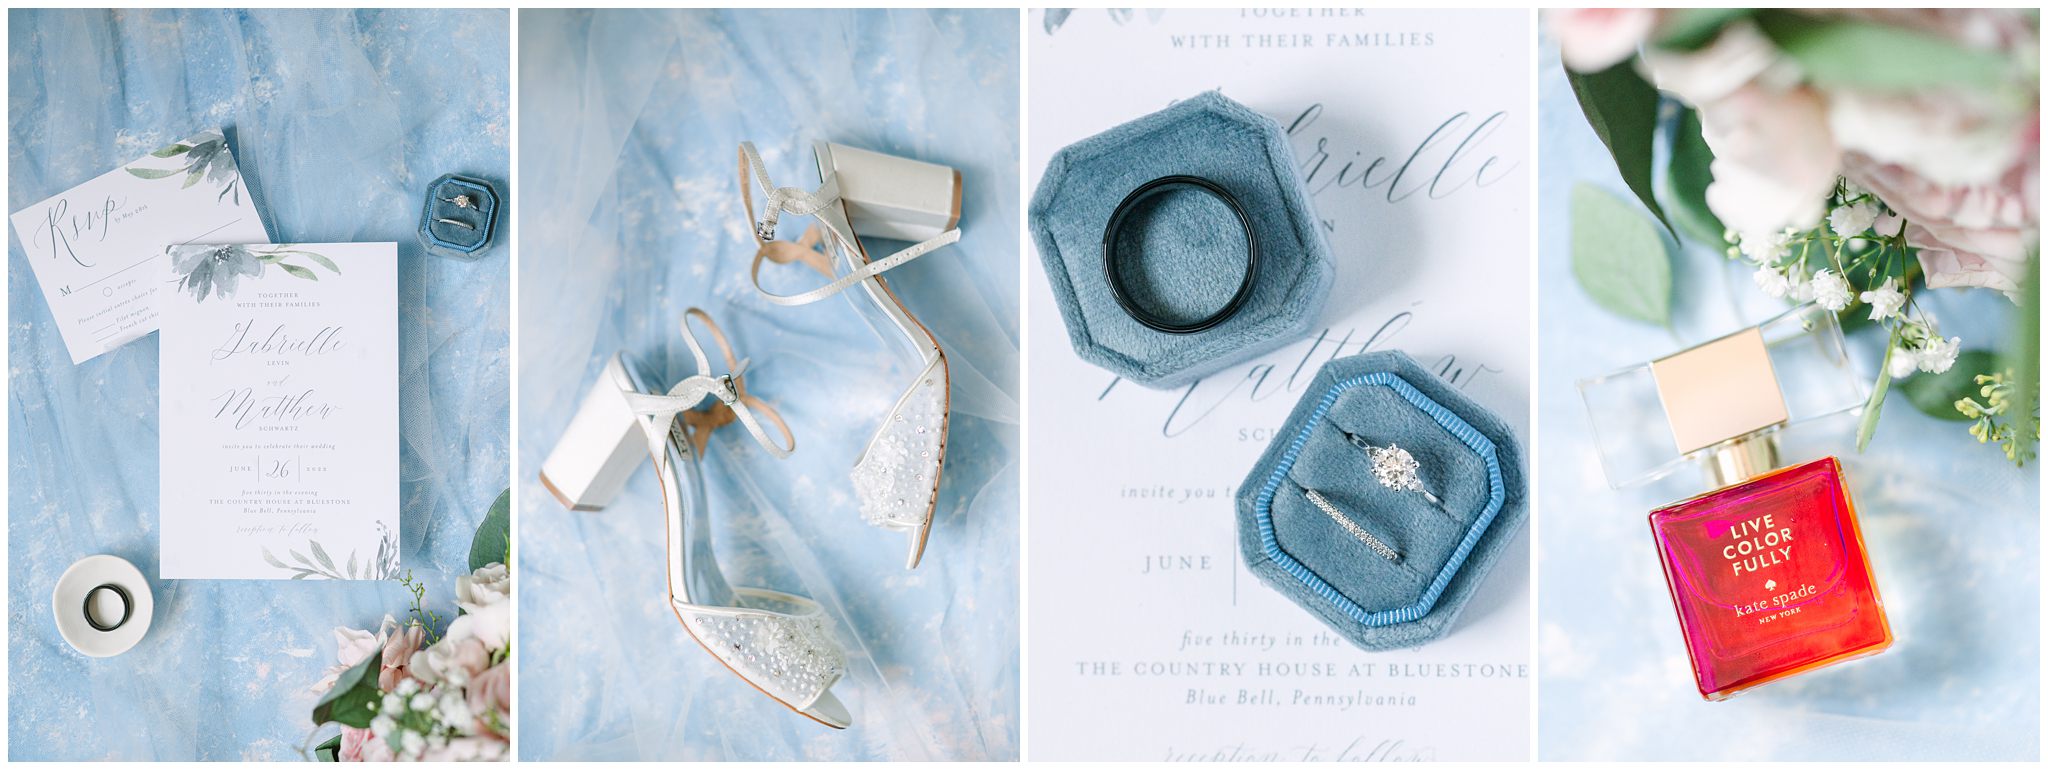
My overall goal was to create a styling mat that would coordinate beautifully with a couple’s color scheme and would help contribute to telling the story of their day in a cohesive way. I have ordered a number of different mats— most some type of linen— throughout the years and, while I have loved those, I have always loved the way that hand-painted mats look in detail photos. I knew purchasing a styling mat for each wedding would be way out of budget and also beyond extra, and I also knew I wanted to have full control over the colors and overall texture and style… again, a little extra, but also more cost effective!
I consulted my pal and brand client Caitlin (Check her out online here!) for help with the project with a pretty strict set of criteria:
- I wanted to create a rollable mat on canvas without being able to see too much of the texture of the canvas
- I wanted there to be a bit of stucco-like texture without cracking or weight
- I wanted to have full control over the look, style, and colors
She got me hooked up with everything I needed and walked me through how to prime and paint my canvas! I am SOOO grateful for her help and cannot wait to share everything I learned and what the process looks like from start to finish! I didn’t take photos of each step, but I did video each step! You can catch a full behind-the-scenes in THIS TikTok!
If you want to create your own hand-painted detail styling mat for wedding day details, keep scrolling! I’m sharing what you need, how long you’ll need, and how to make your own mat!
Supplies:
Pastel Acrylic Paint (Regular acrylic paint would work— I loved these pastels!)
Scissors, measuring stick, paper towels, sponges
*Note this post contains affiliate links and I may receive a small profit when items are purchased through links on this post.*
All in all, this cost me about $60 which really isn’t all that bad considering that I will use many of the tools for more than one mat! I’m already itching to create another mat… and another and another!
Process:
- I started by laying out the canvas to get a visual for how much material I had available. I knew approximately how large I wanted the mats to be and loosely measured to make sure they would be even and then cut the canvas into two mats.
- The canvas I bought had one side that was smoother and one side that was a little more raw? My painter friends are probably cringing right now… but ANYWAYS, I decided to paint the raw side as, with the way the canvas was rolled, it would be on the inside. I primed the canvas with gesso and let this dry. I tried to use painter tape to tape this to my coffee table but it wasn’t strong enough. For the next canvas I make, I’m definitely going to weigh the edges down with something a bit heavier!
- Once it was dry (It took a few hours), I selected my colors and poured them near each other on a paper plate. I knew I wanted the bulk of this mat to be a light blue with some light pops of white and blush throughout. I didn’t want any potential for purple tones, so I chose to mix just the blue colors and added the blush tones in later as texture.
- From there, it really is a free for all! I used a combination of brushes of various sizes and paper towels to create coverage and texture. Caitlin recommended using an acrylic paint thickening medium for texture, and I have to say, this stuff may actually be my favorite! It added the texture I was looking for without the weight or stiffness that may come with other materials. All in all, painting took me about 20-30 minutes and was such a fun time for just letting my mind be creative. Because I didn’t want the surface to be perfect and I knew I could paint over anything I did, I let go of any pressure and just let myself have fun. For the most part, I used blobs of paint and medium to create blended color and texture. Have fun with this part!
- Once the mat dried (I let it dry extra long— for at least 36 hours), I was able to roll it no problem!
Recommendations
- Double-check that you are purchasing an acrylic thickening medium in your desired finish. I wanted my mat to be matte, so I went for a matte finish. (How many times can I say Mat(te)?)
- Dry time is definitely a thing, and with putting clients’ precious items near the surface, you want to make sure it is 100% dry. My mat felt dry overnight, but I would definitely recommend giving yourself an extra 24-48 hour lead time for painting and drying your mat before a wedding day.
- I’m going to do this for wedding days as often as I can (or at least until I have enough boards that I’m happy!) and plan to ask couples for their specific wedding colors + bridesmaids’ dress company and color to help mix paints closer to the tones of their wedding day. My first mat felt a little too sky blue for the slate blue colors being incorporated at the wedding I painted it for at first, but I love how it photographed overall and especially love that it allowed the bride’s slate blue ring box to pop!
- Take the pressure off. The best thing about these mats is that they are literally supposed to be imperfect. I loved getting creative with blending and layering paint. Give yourself full permission to have FUN with this process!
- Be prepared to get messy. I would definitely recommend wearing clothes you don’t mind getting paint on and also may even recommend laying out newspaper or some other kind of protective covering for the place you will be painting.
One last note: I had some hesitations about posting my process because I worried that it may devalue the art and artistic tools that many artists sell in the creative space. Please know that this is not the intention of this blog post. There is SO much value in the work and inspiration these artists create. Please continue to invest in their art and tools. I simply hope this post encourages those that have been seeking a creative outlet to try something new!
If you enjoyed this blog post, you may also like:

[…] obsessed with how their hand painted styling mat coordinated with Katie and Chris’s wedding day color […]